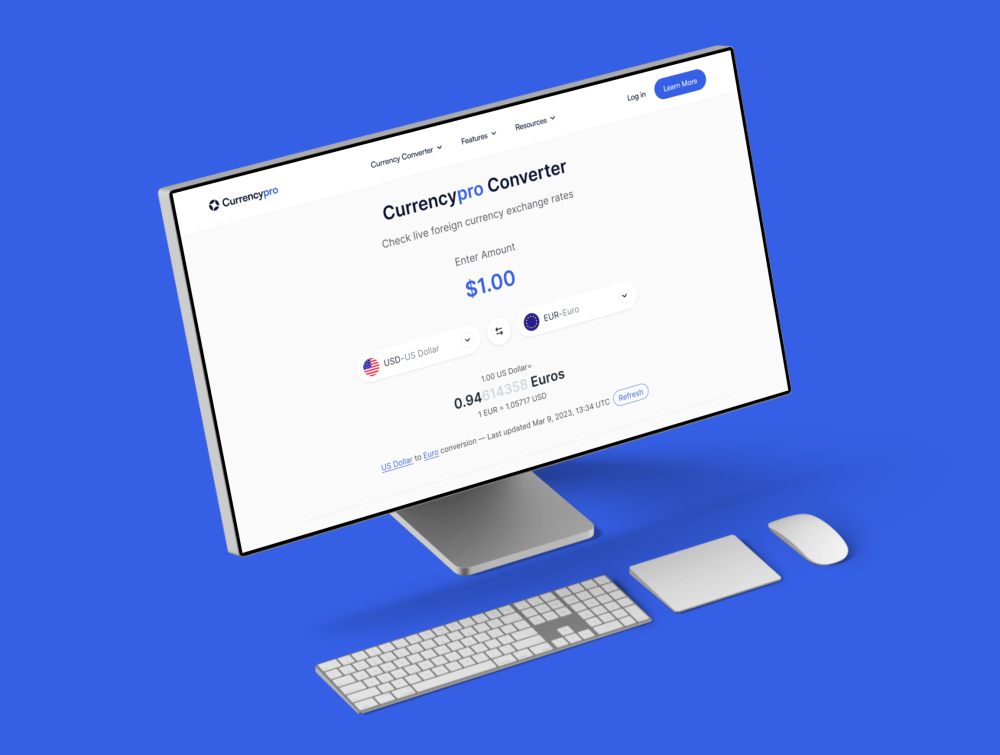
The beginner version of this project lets you create a two-page website where you can select and compare the conversion rate between 3 currency pairs. The project uses the exchange rate API from exchangerate-api.com. You will need a free account that does not require a credit card.
"Start by making it work and then make it better." We recommend you follow this advice when working on this (or any) project.Step 1: Set up the project
You can set up this project in any way you prefer. If you're a beginner and don't have a preference yet, we recommend you either build it online on a platform such as codesandbox.io (using the Vanilla and JavaScript template) or locally.
If you'd like to build it locally, we recommend that you use vitejs.dev with the vanilla template.
ViteJS instructions
These instructions assume you have node and npm installed.
Open your terminal and then run the following command:
npm create vite@latest
Then, enter your project name; for example, currency-pro, and hit enter. Select the Vanilla option with JavaScript, for now.
Then, cd (change directory) into your new project and install the dependencies by running:
npm install
Whenever you want to work on this project, you will need to start the development server with:
npm run dev
Once you have a project where your changes appear in the browser preview, you're ready to move on to the next step.
Step 2: Explore the Exchange Rate API
Visit exchangerate-api.com and sign up for a free account. You do not need to add your credit card details.
The Exchange Rate API also offers free access without needing to create an account and authenticate to the API. However, since this is throttled based on your IP address, there's a high probability that you will hit the limit sooner than you expect. In general, we recommend creating a free account as you will also get to practice authenticating to the API.
We'll use the pair conversion API to build this project. Please read that page.
There are two ways to authenticate with the Exchange Rate API. Read their official authentication guide before moving on. Don't worry if you don't properly understand it as we'll give you some hints when it's time to use the API.
Step 3: Create the landing page
The landing page lists 3 (hardcoded) currencies. The user has to select the base currency and then the target currency. Once they do, the Track exchange rate link will be enabled.
You can find the design of this page using the Figma link above (make sure to look at the design belonging to the Beginner difficulty).
While it would be nice to have the same design, we recommend you start with making the JavaScript functionality work first and then, if you want, you can spend time designing it. In all cases, don't try to tackle both problems (design and functionality) at the same time.
3a. Select your 3 currencies
Select three currencies that you like. Make sure they are supported by the Exchange Rate API (here's a list of currencies they support). Otherwise, you can use the ones we used in the design:
3b. Create the currency buttons
For each currency, create a button with the currency text.
Tip: semantic button without styles
As covered in Chapter 118 of Learn HTML CSS, you can create a semantic button element without styles using the following code:
button {
    all: unset;
    outline: revert;
    box-sizing: border-box;
}
Add the currency code as a data attribute to each button. For example, the Canadian Dollar button should have CAD as a data attribute.
Example button code
Here's an example of how a button with dataset would look like:
<button data-currency="CAD">Canadian Dollar</button>
The user sees the human-readable name (Canadian Dollar) while the currency code is stored in a dataset (data-code) for later use.
3c. Create the Track Exchange Rate anchor
Create the Track Exchange Rate anchor link. By default, make it point to results.html, even though this page doesn't exist yet.
This anchor should be disabled by default as we'll only enable it when the user selects a currency pair.
Step 4: Write the landing page's JS
In this step, we'll write the functionality of the landing page.
4a. Allow the user to select a base currency
Write the necessary JavaScript to allow the user to select one base currency at a time. Store the base currency in a variable for later use.
Additional hints
You will need to select the buttons in the base currency and add an event listener to each button. If a user selects another base currency, you will need to deselect the previous one.
You can read the selected currency code using the dataset property.
4b. Allow the user to select a target currency
Similarly, you want to allow the user to select one target currency and store its currency code for later.
4c. Enable the Track exchange rate link
Once the user selects a base currency and a target currency, you want to enable the Track exchange rate link. You can do this by removing the disabled attribute from the anchor.
At the same time, you must update the link's href to receive the selected base and target currency codes. For example, if the user selected EUR as a base and USD as a target, the link should point to: results.html?base=EUR&target=USD
Additional hints
You can use a template string for easier interpolation.
You need to set the link's href attribute. This can be done using the setAttribute() method.
// assumes element is an anchor element node
const value = "some value";
element.setAttribute("href", `example.html?key=${value}`)
By sending the base and target currencies, we'll later be able to extract them from the URL. Remember that the results.html page does not exist yet.
Step 5: Create the results page
We'll now create the results page. This page will receive the base and target currencies from the URL. It will then use the Exchange Rate API to fetch the conversion rate and display it to the user.
5a. Create the page's HTML
As mentioned before, you can start with very basic HTML for the elements that you will use (base currency, target currency, conversion rate value).
5b. Extract the base and target currencies
We need to extract the base and target currencies from the URL. This can be done using the URLSearchParams API.
Additional hints
You can look up this how to get URL search params use case on codetogo.io.
5c. Fetch the conversion rate
Now that you have the base and target currencies, you can fetch the conversion rate from the Exchange Rate API. We recommend that you start with hardcoded values and only use the correct variables once you got a basic fetch request working.
Remember that you will need to authenticate to the API to be able to access the result. Also, if you've followed the Learn JavaScript course, you can use the same FetchWrapper class you used throughout the fetch chapters.
Additional hints
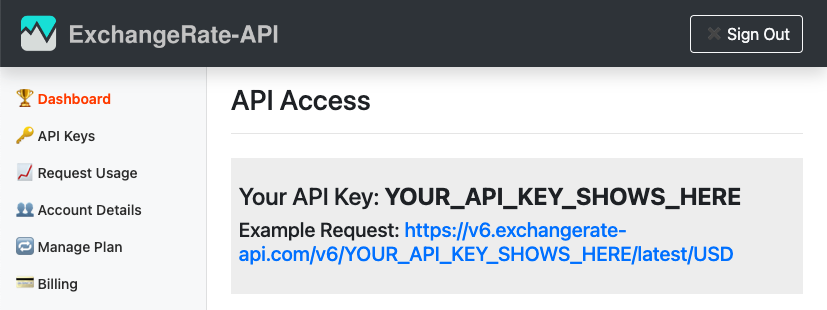
The easiest way to authenticate is using by prefixing your key in the URL. Your API key is visible in your dashboard once you login to exchangerate-api.com.
You can start by clicking on the Example Request provided on the dashboard and then modifying the URL to use the Pair Conversion API.
5d. Display the conversion rate
Once you have the conversion rate, display it to the user.
Additional hints
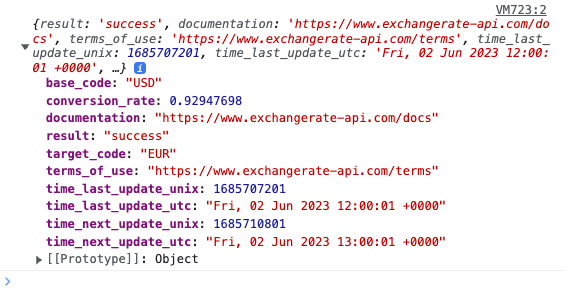
The value you're looking for is inside the conversion_rate key.
Use textContent to set the text content to the conversion rate you got from the fetch requests. Your code should be within the same .then() where you're able to access the conversion_rate.
Step 6. Improve the project (optional tasks)
Once you've completed all the steps, feel free to work on some of the optional tasks below. Remember that it's important to make things work at first and then make them better. This is why the first optional task is to go back to your code and make it better by refactoring it.
You can also implement or improve the design by making it match the one provided on Figma.
Here are some other improvements you can make:
- When the user selects a base currency, disable that same currency from the list of target currencies. This prevents the user from choosing the same currency pair; for example, EUR/EUR.
- Don't allow the user to select a target currency before selecting a base currency.
- Add the currency flags using emojis. You can write them using your emoji keyboard or using a search engine.
- Implement the refresh button on the results page by making another call to the Exchange Rate API. However, note that the free plan of the exchange rate API updates once a day. So, this will not have any visible effect.
- If you'd like to practice your TypeScript skills, create a new project using the TypeScript template and start fixing the errors one by one. Check out Learn TypeScript.
Step 7. Finalize and deploy
Once you're happy with the project, you can build it and deploy it.
If you're using Vite, you can build the project by running npm run build. You can then run npm run preview to preview the production version of the project.
You can then deploy it to any static hosting website, such as Netlify or GitHub pages.
Et voila! You can now use this project in your portfolio! Attribution is not required but appreciated. If you enjoyed this project, please share it with your friends and check out LearnJavaScript.online!
You can also let us know if you have any feedback by filling out this anonymous feedback form.
The advanced version of this project lets you create a two-page website where you can select and compare the conversion rate between currency pairs provided by the exchangerate-api.com. You will need a free account that does not require a credit card to fetch the list of currencies and get a pair's exchange rate.
"Start by making it work and then make it better." Even for the advanced version of this project, we recommend you follow this advice when working on this (or any) project.Step 1: Set up a local project
Start by setting up this project using vitejs.dev with the vanilla template.
ViteJS instructions
These instructions assume you have node and npm installed.
Open your terminal and then run the following command:
npm create vite@latest
Then, enter your project name; for example, currency-pro, and hit enter. Select the Vanilla option with JavaScript, for now.
Then, cd (change directory) into your new project and install the dependencies by running:
npm install
Whenever you want to work on this project, you will need to start the development server with:
npm run dev
Once you have a project where your changes appear in the browser preview, you're ready to move on to the next step.
Step 2: Explore the Exchange Rate API
Visit exchangerate-api.com and sign up for a free account. You do not need to add your credit card details.
The Exchange Rate API also offers free access without needing to create an account and authenticate to the API. However, since this is throttled based on your IP address, there's a high probability that you will hit the limit sooner than you expect. In general, we recommend creating a free account as you will also get to practice authenticating to the API.
The advanced version of this project requires you to use two endpoints:
- supported codes endpoint
- pair conversion endpoint
Please take your time to read both pages.
There are two ways to authenticate with the Exchange Rate API. Read their official authentication guide before moving on. We'll give you additional hints related to authentication later when it's time to use the API.
Step 3: Create the landing page
The landing page lists the currencies that are supported by the Exchange Rate API. The user has to select the base currency and then the target currency. Once they do, the Track exchange rate link will be enabled.
You can find the design of this page using the Figma link above (make sure to look at the design belonging to the Advanced difficulty).
While it would be nice to have the same design, we recommend you start with making the JavaScript functionality work first and then, if you want, you can spend time designing it. In all cases, don't try to tackle both problems (design and functionality) at the same time.
3a. Fetch the list of currencies
Use the supported codes endpoint to get a list of the supported currencies.
Remember that you will need to authenticate to the API to be able to access the result. Also, if you've followed the Learn JavaScript course, you can use the same FetchWrapper class you used throughout the fetch chapters.
Additional hints
The easiest way to authenticate is using by prefixing your key in the URL. Your API key is visible in your dashboard once you log in to exchangerate-api.com.
You can start by clicking on the Example Request provided on the dashboard and then modifying the URL to use the Pair Conversion API.
3b. Render the list of currencies
Once you have the list of currencies, render them in the DOM once for the base currency and once for the target currency.
For each currency, create a button with the currency text.
Tip: semantic button without styles
As covered in Chapter 118 of Learn HTML CSS, you can create a semantic button element without styles using the following code:
button {
    all: unset;
    outline: revert;
    box-sizing: border-box;
}
Add the currency code as a data attribute to each button. For example, the Canadian Dollar button should have CAD as a data attribute.
Example button code
Here's an example of how a button with dataset would look like:
<button data-currency="CAD">Canadian Dollar</button>
The user sees the human-readable name (Canadian Dollar) while the currency code is stored in a dataset (data-code) for later use.
3c. Allow the user to select the currency pair
It's now time to allow the user to select a currency pair. The user should be able to select one base currency and one target currency.
3d. Create the Track Exchange Rate anchor
Create the Track Exchange Rate anchor link. By default, make it point to results.html, even though this page doesn't exist yet.
This anchor should be disabled by default as we'll only enable it when the user selects a currency pair.
3e. Enable the Track Exchange Rate anchor
Once the user selects a base currency and a target currency, you want to enable the Track exchange rate link. You can do this by removing the disabled attribute from the anchor.
At the same time, you must update the link's href to receive the selected base and target currency codes. For example, if the user selected EUR as a base and USD as a target, the link should point to: results.html?base=EUR&target=USD
Additional hints
You can use a template string for easier interpolation.
You need to set the link's href attribute. This can be done using the setAttribute() method.
// assumes element is an anchor element node
const value = "some value";
element.setAttribute("href", `example.html?key=${value}`)
By sending the base and target currencies, we'll later be able to extract them from the URL. Remember that the results.html page does not exist yet.
Step 4: Create the results page
We'll now create the results page. This page will receive the base and target currencies from the URL. It will then use the Exchange Rate API to fetch the conversion rate and display it to the user.
4a. Create the page's HTML
As mentioned before, you can start with very basic HTML for the elements that you will use (base currency, target currency, conversion rate value).
4b. Extract the base and target currencies
We need to extract the base and target currencies from the URL. This can be done using the URLSearchParams API.
Additional hints
You can look up this how to get URL search params use case on codetogo.io.
4c. Fetch the conversion rate
Now that you have the base and target currencies, you can fetch the conversion rate from the Exchange Rate API. We recommend that you start with hardcoded values and only use the correct variables once you got a basic fetch request working.
4d. Display the conversion rate
Once you have the conversion rate, display it to the user.
Additional hints
The value you're looking for is inside the conversion_rate key.
Use textContent to set the text content to the conversion rate you got from the fetch requests. Your code should be within the same .then() where you're able to access the conversion_rate.
Step 5. Improve the project (optional tasks)
Once you've completed all the steps, feel free to work on some of the optional tasks below. Remember that it's important to make things work at first and then make them better. This is why the first optional task is to go back to your code and make it better by refactoring it.
You can also implement or improve the design by making it match the one provided on Figma.
Here are some other improvements you can make:
- When the user selects a base currency, disable that same currency from the list of target currencies. This prevents the user from choosing the same currency pair; for example, EUR/EUR.
- Don't allow the user to select a target currency before selecting a base currency.
- Show when the exchange rate was last updated. Use the browser's new
Intl.RelativeTimeFormat API to get a human-friendly description (5 minutes ago, 1 hour ago, etc.). Also, you can make this update every minute using setInterval. - Implement the swap button. Clicking on this button would redirect the user to the same page but with different URL parameters as it swaps the base and target currencies.
- Implement the refresh button on the results page by making another call to the Exchange Rate API. However, note that the free plan of the exchange rate API updates once a day. So, this will not have any visible effect.
- Add the currency flags. This requires you to find a package you can import into your project to get the icon (or emoji) for each country by its country code.
- If you'd like to practice your TypeScript skills, create a new project using the TypeScript template and start fixing the errors one by one. Check out Learn TypeScript.
Step 6. Finalize and deploy
Once you're happy with the project, you can build it and deploy it.
If you're using Vite, you can build the project by running npm run build. You can then run npm run preview to preview the production version of the project.
You can then deploy it to any static hosting website, such as Netlify or GitHub pages.
Et voila! You can now use this project in your portfolio! Attribution is not required but appreciated. If you enjoyed this project, please share it with your friends and check out LearnJavaScript.online!
You can also let us know if you have any feedback by filling out this anonymous feedback form.